| Index:
A. Splitting
Polygons using the Split Shape Tool
B. Appending
Polygons using the Subtract Polygon Command
C. Creating
Holes in Polygons and Removing Holes from Polygons
D. Drilling
Polygons using the Drill Polygon Command
E. Creating
Polygons that are Within other Polygons
A.
Splitting Polygons using the Split Shape Tool
The
Split Shape Tool ( )
is used to split existing polygons into smaller polygons. )
is used to split existing polygons into smaller polygons.
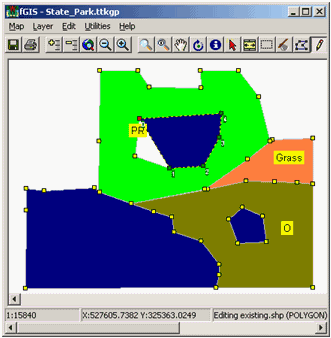
In
the following example, the green polygon labeled "PR"
(show below) will be split into two polygons using the Split Shape
Tool.
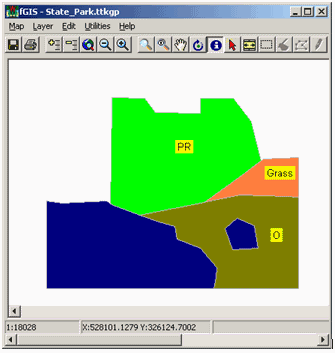
The green polygon labeled "PR"
will be split using the Split Shape Tool.
1. Select
the Edit - Start Editing command to edit the polygon shapefile.
2. Click
on the Split Shape Tool ().
3. Digitize
a split line that begins and ends outside of the polygon
to be split, as shown below.
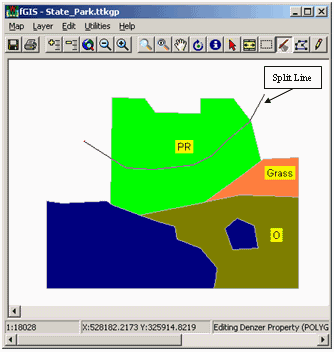
To split a polygon, the split line must
begin and end outside of the polygon.
4.
Double-click to end
the split line and split the polygon into two polygons.
5.
The result of splitting the
polygon with the Split Shape Tool is shown below. Notice
how the attributes of the original polygon have been copied
to the newly created polygons and that the label is automatically
updated.
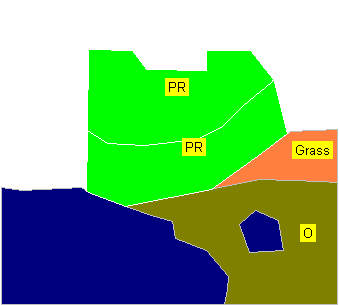
The results of splitting a polygon using
the Split Shape Tool.
B.
Appending Polygons using the Subtract Polygon Command
When
digitizing polygons that are adjacent to one another, it is often
easier to append a new polygon using the Subtract Polygon command,
rather than trying to snap the new vertices to the vertices of
an existing polygon.
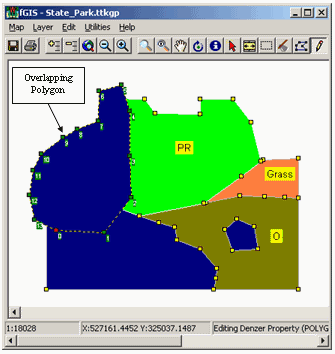
In
the following example, the red polygon labeled "A" (shown
below) will be appended to the adjacent polygons using the Subtract
Polygon command.
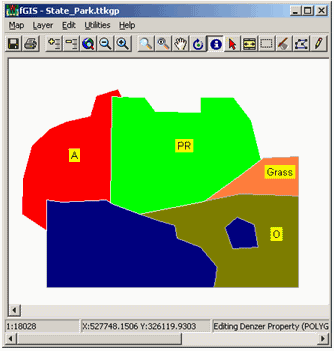
The red polygon labeled "A"
will be appended using the Subtract Polygon command.
1.
Select the Edit - Start
Editing command to edit the polygon shapefile.
2.
Using the New Shape Tool
( ),
digitize a new polygon that overlaps the edges of the green
and blue polygons as shown below. ),
digitize a new polygon that overlaps the edges of the green
and blue polygons as shown below.
The overlapping polygon will be "subtracted"
from the polygons that it overlaps.
3.
Select the overlapping
polygon using the Pick tool ( ). ).
4.
Select the Edit - Polygon
Functions - Subtract Polygon command to "subtract"
the overlapping polygon from the polygons that it overlaps.
5.
The result of "subtracting"
the polygon with the Subtract Polygon command is shown
below. The boundaries of the red polygon labeled "A"
are now coincident with the boundaries of the adjacent
polygons.
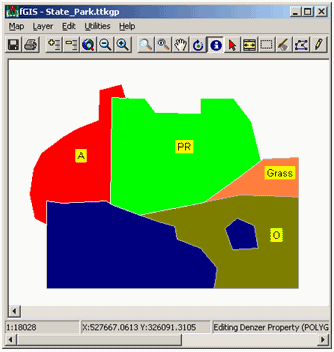
The boundaries of the red polygon labeled
"A" are now coincident with the boundaries of the adjacent
polygons.
C.
Creating Holes in Polygons and Removing Holes from Polygons
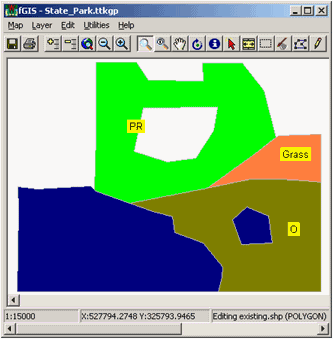
Often
it is necessary to create holes in polygons or remove holes from
polygons, like the hole shown in the green polygon labeled "PR"
shown below.
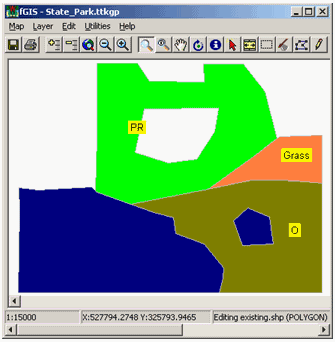
The green polygon labeled "PR"
contains a hole.
To
add a hole to a polygon, use the following procedure.
1.
Select the Edit - Start
Editing command to edit the polygon shapefile.
2.
Select the polygon to
add a hole to using the Edit Points/Edit Select tool ( ).
Note: The polygon is selected when each of its vertices
are numbered. ).
Note: The polygon is selected when each of its vertices
are numbered.
3.
Right mouse click on
the selected polygon where you want to start adding the hole and
select the Polygon Functions - Add Part (or make hole) command,
as shown below. Note: The Add Part (or make hole)
command is only available on the right mouse click popup menu
and NOT on the Edit menu.

The Add Part (or make hole) command is
used to make holes in polygons.
4. Now
digitize the boundary of the hole. Note:
It's best to digitize a hole in the clockwise direction, otherwise
the polygon will have to be fixed using the Polygon Functions
- Fix Polygon Winding command.
5. To
finish digitizing the hole, double-click OR select
the Edit - Close Shape command.
6. If
the hole doesn't appear when it
is digitized, make sure the polygon is still selected and select
the Polygon Functions - Fix Polygon Winding command.
To
remove a hole from a polygon, use the following procedure.
1. Select
the Edit - Start Editing command to edit the polygon shapefile.
2. Select
the border of the hole to be removed using the Edit
Points/Edit Select tool ().
Note: The hole is selected when each of its vertices
are numbered and shown in green as shown below.
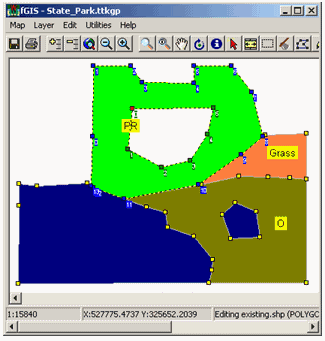
The hole in the green polygon labeled
"PR" is selected when its vertices are numbered and
shown in green.
3. Once
the hole has been selected, select the Polygon Functions - Delete
Part command to remove the hole from the polygon.
D. Drilling
Polygons using the Drill Polygon Command
When
digitizing polygons into areas where polygons already exist, it
is often easier to "drill" a new polygon using the Drill
Polygon command, rather than trying to snap the new vertices to
the vertices of an existing polygon.
Note: The Drill Polygon
command only works with polygons that intersect the borders of
polygons they overlap. To "drill" a polygon that
is entirely contained within another polygon, first create a hole
in the containing polygon, then "snap" a new polygon
into the hole.
In the following example,
the red polygon labeled "A" (shown below) will be "drilled"
into the adjacent polygons using the Drill Polygon command.
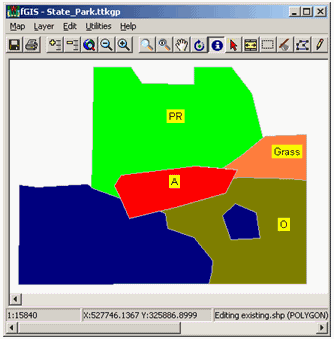
The
red polygon labeled "A" will be drilled into the adjacent
polygons using the Drill Polygon command.
1. Select
the Edit - Start Editing command to edit the polygon shapefile.
2. Using
the New Shape Tool (),
digitize a new polygon that overlaps the edges of the green,
blue, brown, and peach polygons as shown below.
3. Select
the new shape using the Pick tool ().
Note: If the new shape overlaps other shapes entirely
(as it does in this example), then use the Layer - Select
Last Shape command to select the new shape.
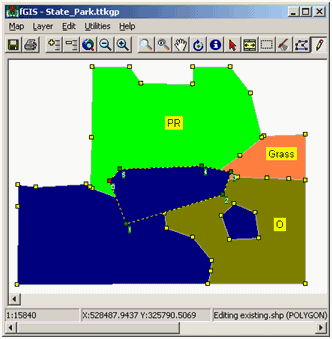
The
overlapping polygon will be "drilled" into the polygons
that it overlaps.
4. Select
the Edit - Polygon Functions - Drill Polygon command to
"drill" the overlapping polygon into the polygons that
it overlaps.
5. The
result of "drilling" the polygon with the Drill Polygon
command is shown below. The boundaries of the red polygon
labeled "A" are now coincident with the boundaries
of the adjacent polygons.
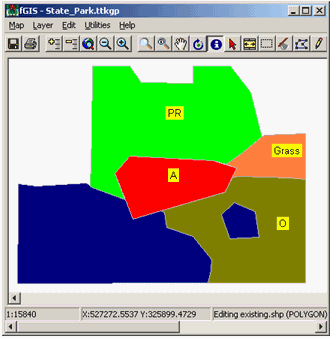
The
boundaries of the red polygon labeled "A" are now coincident
with the boundaries of the adjacent polygons.
E. Creating Polygons
that are Within other Polygons
As
mentioned above, the Drill Polygon command can NOT be used
to create polygons that are entirely within the boundaries of
another polygon.
To create polygons that
are entirely within other polygons, use the following procedure.
1. First
create a hole in the underlying polygon that is the shape
of the polygon you want to create using the procedure mentioned
in C. Creating Holes in Polygons and Removing Holes from Polygons
(above), as shown below.
First
create a hole in the underlying polygon.
2. Set
the Snapping layer to the editable layer using the snap layer
listbox, shown below.
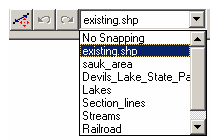
Set
the Snapping layer in the snap layer listbox.
3. Then,
using the New Shape Tool (),
digitize a new polygon and "snap" its vertices into the
newly created hole as shown below.
The
new polygon is being "snapped" into the hole.
(Brian Brown, 1/05)
|