|
 Together,
freeware programs
TatukGIS Viewer and HyperCube
can be used to rectify and georeference imagery. HyperCube, produced
by the US Army Corps of Engineers Topographic Engineering Center,
includes functions to analyze, filter, warp, mosaic, reformat,
calibrate, and combine multi and hyper-spectral imagery and data. Together,
freeware programs
TatukGIS Viewer and HyperCube
can be used to rectify and georeference imagery. HyperCube, produced
by the US Army Corps of Engineers Topographic Engineering Center,
includes functions to analyze, filter, warp, mosaic, reformat,
calibrate, and combine multi and hyper-spectral imagery and data.
The following
technique is helpful if you have scanned hand-drawn maps, paper
maps, printed photos or any digital images that you would like
to warp or rubber-sheet to conform to a known projection.
|
|
|

|
|
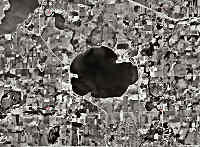
A - Source
|
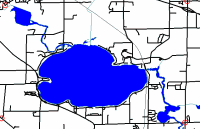
B - Target
|
C - Warped Image
|
There are four basic steps:
- Scan or copy and save a geographic image (A). Either a TIFF
or JPEG format will do.
- Use the TatukGIS Viewer to
create a georeferenced target image (B) and world
coordinate file from previously rectified vector or graphic
files.
- Load the source and target
images into HyperCube. The warp (C) is accomplished by designating
common control points on both the source and target images.
HyperCube will scale,
rotate, warp and crop (A) as needed so that it is the same size
and shape as (B).
- Finally,
using Windows Explorer, the world coordinate file from step
2 is copied from (B) to (C).
Detailed Procedures
With
Your Photo/Scanning Software:
If
you scan a paper map or line drawing (such as a timber-type overlay)
on a flatbed scanner, capturing the image at 150 DPI to 200 DPI
is generally sufficient.
Paper
aerial photographs are typically 9" x 9", whereas most
consumer type scanners are limited to an 8.5" width. Inexpensive
scanners may introduce distortions or noise in addition to aberrations
caused by terrain, optics or aircraft orientation. That said,
a consumer-grade flatbed scanner can produce acceptable results
for smaller aerial photo conversion projects.
The
following table provides three typical aerial photo scales and
the resulting pixel resolution and image output file sizes for
various DPI scan settings for a 9" x 9" photo.
|
Aerial Photo Scale: |
1:10,000 |
1:24,000 |
1:40,000 |
|
|
Kilometers
Across:
|
2.29 |
5.5 |
9.1 |
| DPI
Scan |
Resultant
Pixel Size in Meters
|
Image Width in Pixels |
Color
vs.
Greyscale File Size in Megabytes
|
|
150 DPI |
1.7 |
4.1 |
6.8 |
1,350 |
5Mb |
2Mb |
|
300 DPI |
0.8 |
2.0 |
3.4 |
2,700 |
21Mb |
7Mb |
|
600 DPI |
0.4 |
1.0 |
1.7 |
5,400 |
83Mb |
28Mb |
|
1200 DPI |
0.2 |
0.5 |
0.8 |
10,800 |
334Mb |
111Mb |
Table Source:
http://www.ncgia.ucsb.edu/education/curricula/cctp/units/unit18/18.html
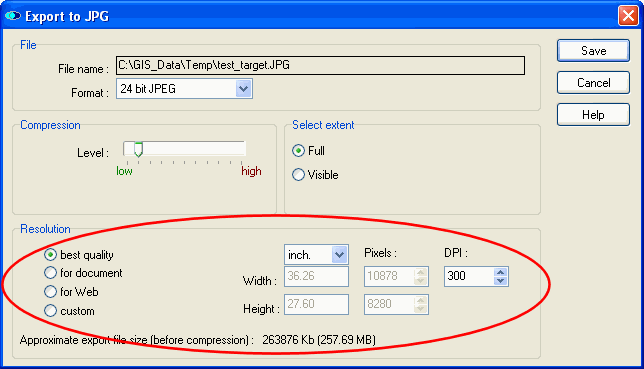
In the TatukGIS Viewer:
The view can include a previously registered aerial photo and/or
any vector layers that might provide good landmarks. Save the
view with 'File>Export to Image'. Save the image in either
a TIFF or JPEG format (accepted by HyperCube). TatukGIS Viewer
will write a world coordinate file for the saved target view,
which will be the key to geo-referencing the source image.
Selecting common
control points in the warping process will be much easier if you
make the source and target images approximately the same dimensions
and pixel resolution. For example, let's say you scan a paper
map or photo and the resulting source image is 10,000 pixels wide.
When you export a target image with the TatukGIS Viewer, you can
adjust the resolution setting to produce a target with about the
same pixel width, shown below.
Making the source
and target images about the same size also means that you are
less likely to lose pixels (details) when the source image is
warped.
In HyperCube
(thanks to Leszek Pawlowicz for this section):
1.
Load in the "source" and "target" image. Use
"File => Open" and specify the file type you want
to open from the drop-down. If either image is in indexed
color (e.g. a standard 256 color DRG USGS topo), you'll have to
use Image=>Convert Image to change it to true color.
2.
Select Functions=>Warp
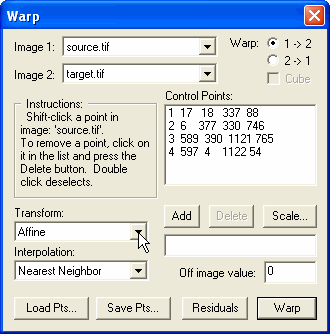
3.
Choose the source and target images using the drop-down menus,
and also specify source and target (1=>2 or 2=>1). Note
that you must specifically choose the images (click on their names
from the drop down for Image 1 and Image 2) even if the
names are already visible in the drop-down menus.
4.
When you've successfully chosen the two images, the "Instructions"
section in the Warp window will now tell you to select corresponding
points in the two images by shift-clicking on the same geographic
point in each window. The minimum number of points will depend
on the Transform you've selected, although at least three points
are needed for the Affine Transform (which is generally the most
useful). When you're done, press Warp and the source image is
warped into the shape and dimensions of the target image. The
title bar of the new image includes a code (Such as "A_N"
for Affine/Nearest Neighbor) to help you keep track of which Transform
and Interpolation method was used. You can change the parameters
and experiment with the results. The control points can also be
saved for re-use.
5.
You can save the warped image as a TIFF, JPEG, or several other
formats, and then use your original world file to georeference
it (i.e., copy and rename the world coordinate file from the target
to the warp).
If
the target image is a GeoTiff, you can also use Hypercube to georeference
the new image. Select the georeferenced target image, and choose
Edit=>Options=>Image to Ref Coords. This will bring
up a window with the georeferencing information; write down
all the numbers and settings here. Then select the new image
you've created by Warp, bring up the Image to Ref Coords
window for this image, and then enter the georeferencing
information and settings exactly as you copied it in the
previous step. Now when you save this image as a TIFF, it
will embed the georeferencing info directly into it.
Note:
HyperCube relies on you to type in the file extension suffix.
If you want to save the warped image as a TIFF, make sure you
append ".tif" to the name of the file.
HyperCube has excellent
documentation in PDF format. See pages 75-76 for more information
about the image warping options.
Downloads
are available at the Army
Corp of Engineers HyperCube page.
You'll need
to visit the Army Corps site, however, for the MacOSX version
or to get the examples and other support files.
To
reproject an image from one coordinate system to another, also
see DGWarp.
Mail at: forestpal@gmail.com
About
© ForestPal
|