Using map data from many sources can be frustrating if coordinate
systems don't match. Layers will not line up in map editors like
TatukGIS Viewer unless they
share the same coordinate system/spatial projection. Some freeware
GIS programs might provide utilities to change projections for
vector layers but not raster images.
GDALWARP is a superb, open source image reprojection tool that
can warp (reproject) images from one coordinate system to others.
It's part of FWTools, developed by Frank Warmerdam.
DGWarp.zip (~12MB)
is a simplified adaptation of GDALWARP. The zip archive includes
GDALWARP and its dependencies plus a few batch file examples with
test images. You merely unzip the file to the "C:\"
root directory to use it. There is no installation procedure or
need to set environment variables. Batch files used to run the
warp engine are relatively easy to copy and edit with Notepad
compared to typing instructions at a command prompt as in the
full version of FWTools. Once set up, batch files can be reused
by simply changing the names of the source and target image files.
To use DGWarp, download and unzip the files to the root directory
"C:\". You can install it elsewhere if you wish,
but you'd need to edit the paths to GDALWARP and test images in
each of the example batch files.
You'll find the following files with Windows Explorer (with View>Thumbnails):
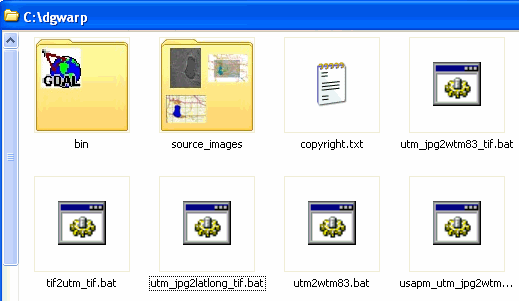
The "bin" contains GDALWARP and all its parts. Three
source images for the example batch files to operate on are in
their own folder. "Copyright.txt" includes a disclaimer
and Frank Warmerdam's credits. The five "geared"
batch files are the examples. Double-click any of them, and new
GeoTiff target files will be added to C:\dgwarp as GDALWARP converts
the source images.
Start Windows Notepad and drag tif2utm_tif.bat (or any of the
other batch files) into it. Batch files are simple text giving
a series of instructions to the operating system. In this example
"bat" file, Notepad will look like this:

c:\dgwarp\bin\gdalwarp
-t_srs "+proj=utm +zone=16 +datum=NAD83" -co INTERLEAVE=PIXEL
-co TFW=YES c:\dgwarp\source_images\lake_geo.tif c:\dgwarp\lake_utm.tif
In the text above:
-
[c:\dgwarp\bin\gdalwarp]
gives the path to the program GDALWARP.exe and starts it.
-
[-t_srs "+proj=utm +zone=16 +datum=NAD83"] tells
GDALWARP to reproject the source image from whatever it is
to a UTM - Zone 16 - NAD83 coordinate system.
-
[-co INTERLEAVE=PIXEL]
tells GDALWARP to combine the RGB layers into one. If you
omit this command, GDALWARP produces a multi-band GeoTiff.
Simple GeoTiff readers like fGIS or ArcView cannot properly
display multi-band GeoTiffs, so it's better to turn that off
if you intend to use the image in a program like fGIS. Multi-spectral
programs like ERDAS ViewFinder or the ECW utilities would
not require use of this command.
-
[-co
TFW=YES] writes a world coordinate file. A "TFW"
file is not necessary if you create a GeoTiff, which has the
coordinate information built-in, but handy if you want to
convert the image to another format. The file can be renamed
to fit other file formats, e.g. change the "tfw"
extension to "jgw" for a JPEG file.
-
The second line (actually part of the first line, but word-wrap
is on) shows the path to the source image [c:\dgwarp\source_images\lake_geo.tif]
and where to write the target image [c:\dgwarp\lake_utm.tif].
You could substitute your own source image name and paths
for these two entries. Save the batch file and double-click
it to run.
USAPhotoMaps,
by Doug Cox, is a common source of aerial photos and topographic
maps downloaded from TerraServerUSA. Two of the batch files provide
examples for converting the TerraServer images created by USAPhotoMaps
to other coordinate systems. The file "utm_jpg2latlong_tif.bat"
will convert any image in a UTM-NAD83 projection to Geographic
Lat/Lon coordinates, but you'll need to adjust the zone
number for the source image in the batch file. Be sure the
source JPEG and its companion world file are together.
The file "usapm_utm_jpg2wtm..."
changes a TerraServer aerial photo to the Wisconsin Transverse
Mercator projection. If you double-click it, the process takes
about a minute (maybe more on slower machines) with GDALWARP showing
a countdown as progress is made. That file looks like this:

In this batch
file:
-
[c:\dgwarp\bin\gdalwarp]
gives the path to the program GDALWARP.exe and starts it.
-
[-s_srs
"+proj=utm +zone=16 +datum=NAD83"] provides the
projection system of the USAPhotoMaps source image.
-
[-t_srs
"+proj=tmerc +lat_0=0.0 +lon_0=90W +k=0.9996 +x_0=520000.0
+y_0=-4480000.0 +datum=NAD83"] specifies the target image's
projection and the Transverse Mercator parameters used by
Wisconsin DNR. Substitute values for the following variables
for other locations or see the PROJ.4
documentation for a full list of projection codes.
-
Map Projection Name:
Transverse Mercator = [+proj=tmerc]
-
Latitude of Projection Origin:
0
degrees = [+lat_0=0.0]
-
Longitude of Central Meridian:
-90 degrees West = [+lon_0=90W]
-
Scale Factor at Central Meridian:
0.9996 = [+k=0.9996]
-
False Easting:
520,000 = [+x_0=520000.0]
-
False Northing:
-4,480,000 = [+y_0=-4480000.0]
-
Horizontal Datum:
NAD83 = [+datum=NAD83]
-
[-co INTERLEAVE=PIXEL]
tells GDALWARP to combine the RGB layers into one.
-
[-rcs] tells
GDAL to use an optional (slower) cubic-spline resampling method.
It might give better results in some situations. The default
method without the "-rcs" switch also works well
and is generally preferred.
-
[-of GTiff]
is a command to change the source JPEG image to a GeoTiff
format.
-
[c:\dgwarp\source_images\usapm.jpg
c:\dgwarp\usapm_wtm.tif] are the source and target images.
The full version
of GDALWARP offers
many options, although the simplified batch file process
provided here will only produce GeoTiff files. Get the full version
or documentation at:

and
MAPTools.ORG
If you are starting
with a scanned image without coordinate registration, a relatively
simple method to geo-reference
a scanned image is also available with the TatukGIS
Viewer and HyperCube, from the US Army Corps of Engineers.
Download DGWarp with the
preceding examples here.
|